TL;DR: Forensic building envelope testing answers a narrow question: did this assembly let water in, under these conditions, on this day? That answer is valuable. By itself, though, it does not establish when a defect was created, who created it, or whether the same condition exists across the building. Those answers come from connecting the test to construction records, exploratory openings, and a practical understanding of how the work was built.
When a water intrusion claim reaches the expert stage, testing comes up early. Someone wants to put water on the windows, scan the roof, or open a wall. That instinct is sound. A properly run test turns “the building leaks” into a documented observation at a specific location.
Trouble starts when a test result is asked to carry more weight than it can hold. A failed window test is not a finding of fault. A clean roof scan is not proof the membrane was never damaged. For attorneys on either side of a construction defect case, knowing what each test can’t tell you is as useful as knowing the result. It shapes the questions you ask your own expert and the questions you ask the other side’s.
What Common Field Tests Actually Measure
Most forensic building envelope testing on commercial buildings draws from a short list of methods. Each is built for a particular part of the envelope and a particular question.
ASTM E1105 is the field water test for installed windows. A calibrated spray rack wets the exterior while a chamber on the interior pulls negative pressure, which recreates the pressure a wind-driven thunderstorm puts on the building. Water goes on at a calibrated rate while the chamber holds a pressure difference set by the project specification or test protocol. The standard itself says it is meant mainly to check performance against specified criteria and that other procedures may be needed to find the source of a leak. In our practice, we don’t run it on operable doors. Pulling pressure across a door draws water through components that are built to open.
AAMA 501.2 is the nozzle test for storefronts, curtain walls, and glazing systems larger than an individual window. A calibrated nozzle is held 12 inches from the joint and worked slowly along it at roughly 1 foot per minute. It is a quality assurance and diagnostic check. It is not intended to represent a system’s rated performance in wind-driven rain. That distinction matters if anyone later offers a 501.2 result as proof that a curtain wall failed its specification.
Electronic leak detection (ELD) puts an electrical charge on a roof or waterproofing membrane. The surface is then scanned with a broom or pole-mounted tool to locate holes, voids, and damage. It finds breaches in the membrane. It does not show how water traveled once it got through.
Infrared thermal surveys use a thermal camera to find temperature differences that can indicate trapped moisture or air leakage. They are most often used on roofs, and sometimes on walls and around windows. Jeff is a Certified Infrared Thermographer (CIT), and an infrared image shows a thermal anomaly, not a diagnosis. More than one condition can produce a similar pattern. Findings need confirmation with moisture readings or an opening before they support an opinion.
| Test | Typically used on | What it can show | What it cannot show on its own |
|---|---|---|---|
| ASTM E1105 | Individual windows and their perimeter | Whether the opening leaks at a set pressure and water rate | The exact leak path or who created it |
| AAMA 501.2 | Storefront, curtain wall, larger glazing | Leaks at specific joints and framing | Rated wind-driven rain performance |
| ELD | Roof and waterproofing membranes | Location of holes, voids, and damage | When or how the damage happened |
| Infrared survey | Roofs, walls, around windows | Areas that warrant closer investigation | Confirmed moisture or cause without follow-up |
Three Questions a Test Cannot Answer by Itself
When the defect was created
A test is a snapshot. It describes the assembly on the day it was tested and nothing after.
Most of the membrane damage ELD finds comes from the construction process itself. Mechanical, electrical, and plumbing trades use finished roofs as work platforms. Tools get dropped, screws get left behind, and membranes get punctured. The crew that did it doesn’t always speak up, because nobody wants to be the one who put a hole in the roof.
That sequence matters in litigation. If a construction-phase report shows a membrane passed ELD, the next question is what happened between that test and the day it was covered. The passing result can be accurate and still say nothing about the damage that caused the leak.
ASTM says as much in the standard itself. Its notes on E1105 recognize that installation and the work of later trades can affect how an installed window performs, and that the test does not detect water that gets into the assembly where no one can see it. A test result is a record of one moment, not a history of the building.
Who created it
When a window fails an E1105 test, the window unit is rarely the problem. In our experience, the failure is usually at the perimeter flashing, where the window meets the rest of the wall. The causes we see most often point to different parties:
- Sequencing. Components go in out of order, or the general contractor releases a wall in partial sections a week apart and expects the pieces to tie together.
- Incompatible materials. The specification calls for a specific tape and primer. The crew uses a different primer, or finishes with a leftover roll that has been riding in the truck since three jobs ago.
- Damage by other trades. The window installer does the work correctly, and the siding crew later cuts, scratches, or nails through the flashing.
One failed test at one opening can be consistent with any of these. Sorting them out takes the drawings, the specifications, the sequencing records, and someone who has installed this kind of work and knows what each failure looks like once it’s opened up.
Whether the condition is everywhere
Field tests are run on a sample: selected windows, a section of curtain wall, a portion of the roof. A failure at one location is a fact about that location. Extending it to every opening on an elevation requires a basis. That might be a consistent installation pattern confirmed at multiple openings, or evidence that the same crew used the same method throughout.
Both sides should be asking this question. An opinion that projects one failure across a building without explaining why gives opposing counsel an easy target. An opinion that refuses to extrapolate from a well-documented pattern can leave real damage unaccounted for.
Where Destructive Testing Fits
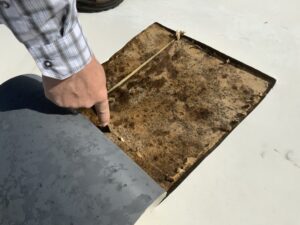
Some questions can only be answered by looking inside the wall or roof. On forensic assignments, we sometimes remove a window, open a section of wall, or take out part of a roof. That lets us see the flashing, the layering, and the materials that were actually installed. For the tear-out, we hire a local contractor in the project’s market so the work is done properly and the assembly can be put back.
An opening shows what a water test cannot: whether the sill pan was installed, what order the layers went on, which products were used, and how far the damage extends. It also changes the building permanently, so it has to be documented carefully. We photograph and record conditions before, during, and after each opening. We also tie each opening back to the test result or observation that justified it.
On a roof collapse matter in New Jersey, Jeff flew in to examine the building and the fallen components, which had been removed and held in a warehouse. While there, he met with the opposing experts. Protocols, notice, and attendance are legal questions for counsel. Our part is making sure whatever gets opened, removed, or tested is recorded clearly enough to support sound opinions.
Construction-Phase Test Records Are Evidence Too
Much of the testing on commercial projects is written into the specifications, so many buildings in dispute already have test reports in the file. Those reports can be some of the most useful documents in a case if you know how to read them.
On a typical ELD day, we confirm the test area with the superintendent and scan the membrane. We mark each deficiency on the surface in crayon and photograph it. On larger projects, we deliver a roof plan showing where each deficiency was found. Ideally, the contractor repairs behind us and we retest the marked areas before we leave. (More on the method in our article on what electronic leak detection finds that visual inspections miss.)
That process creates a record, and the record raises specific questions:
- Was the area that leaked the same area that was tested?
- Were the marked deficiencies repaired, and was each repair retested?
- How much time passed, and how many trades worked the area, between the test and the cover?
- Who hired the testing firm, and did they have a stake in the result?
The last question deserves attention. Some design consultants deliberately don’t test their own design work, because they don’t want to be the ones finding breaches in what they specified. They either assign third-party testing to the roofer or bring in an independent firm. When reviewing test records, it’s fair to ask whether that separation existed.
Photographs deserve the same scrutiny. Good contractors take progress photos and hand them over without hesitation. Lower-tier subcontractors often have none or won’t release them. Even required photos can show one clean area and say nothing about the rest of the roof. We’ve written more about how supervision gaps on the job site shape these cases.
How We Approach Testing on a Litigation Assignment
Our forensic work usually starts at a desk, not on a roof. We review the documents for a breakdown in communication, the wrong system, incorrect materials, or poor workmanship in the field. From there, the site visit is a fact-gathering mission. We choose each test to answer a specific question in the case, not to generate data for its own sake.
In our reports, we keep the steps separate: what we observed, what we tested and how, what the test showed, and what we concluded and why. That separation is what lets an opinion hold up when opposing counsel starts pulling on it. You can see how that fits into the full engagement on our litigation and expert witness services page.
Jeff and Mark both came to consulting from the contracting side. Jeff went full time in commercial roofing in 1987, working in the family business his father and grandfather built. Mark spent 31 years at Hamlin Roofing Company in estimating, sales, and production. That background helps when a test result has to be translated into what actually happened on the job, which is why contracting experience matters in a defect case. We work for both plaintiffs and defendants.
If you have a water intrusion claim and are weighing whether testing will help, send us what you have. The initial review is at no charge. We look at the documents and photographs to see whether we can provide value. If we can’t, we’ll tell you and point you toward someone who can. If cost is part of the conversation, here is what a construction defect expert witness costs and what that expense can save.
Related Articles
- How to Prove a Construction Defect in Court: What Building Envelope Evidence Actually Shows
- Building Envelope Expert Witness: 5 Things Good Attorneys Look For
- Window Water Leak Testing: What It Reveals Before the Building Opens
Frequently Asked Questions
Can a building be tested after repairs have been made?
Yes, but the result describes the repaired assembly, not the original installation. Once remediation changes the conditions, a test may no longer show how the original work performed. When possible, document and test before repairs begin.
Does a passing water test mean there is no defect?
No. A pass means the tested area resisted water under the test conditions on that day. It doesn’t cover untested areas, damage that happened after the test, or conditions the method wasn’t designed to simulate.
Do you work for plaintiffs or defendants?
Both. Our job is to establish what the evidence shows about how the building was built and why it is leaking, regardless of who retains us.
Can you perform testing outside the Carolinas?
Yes. Most of our testing equipment can travel by air, and we take assignments nationwide.